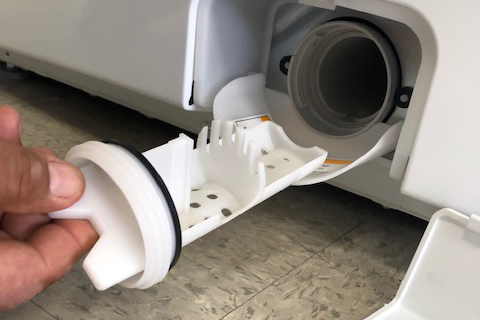

When your washing machine stops rinsing, it can be frustrating, but fortunately, there’s a simple trick you can try before calling a technician: cleaning the filter. The filter in your washing machine plays a crucial role in trapping debris and preventing it from reaching the drainage pump, protecting the pump and preventing blockages.
Over time, the filter can get clogged with lint, coins, hair, and other small objects that might have been left in pockets. This accumulation can restrict the water flow and cause the machine to stop rinsing properly. By cleaning the filter regularly, you can maintain the efficiency of your washing machine and avoid unnecessary breakdowns.
Here’s a step-by-step guide to help you clean the filter:
- Safety first: Before you start, ensure that your washing machine is unplugged from the power source. Safety should always be your top priority when dealing with any electrical appliance.
- Locate the filter: The filter is typically situated at the bottom front of the washing machine. It is usually behind a small hatch or cover that can be easily opened.
- Prepare the area: Place a towel or a shallow container beneath the filter area to catch any water that might spill out during the cleaning process. This will prevent mess and water damage to your floor.
- Open the filter compartment: Carefully open the hatch or cover to access the filter. Be cautious as water might still be inside, and it could pour out once the compartment is open.
- Remove the filter: Once the compartment is open, you’ll find the filter. Depending on the model, the filter might be a twist-off type or a pull-out type. Follow the manufacturer’s instructions to remove it safely.
- Clean the filter: Rinse the filter under running water to remove any dirt, lint, or debris that has accumulated. You can also use an old toothbrush or a soft brush to gently scrub away stubborn residue.
- Inspect for damage: While cleaning, check the filter for any signs of damage. If you notice any cracks or breakages, it’s essential to replace the filter to ensure optimal functioning.
- Reinstall the filter: Once the filter is clean and free from debris, carefully put it back into its original position. Make sure it is secured properly to avoid leaks.
- Close the compartment: Close the hatch or cover securely, ensuring that it is sealed correctly.
- Test the washing machine: Plug the washing machine back into the power source and run a short rinse cycle to check if the problem has been resolved. If the machine is rinsing properly, you’ve successfully solved the issue!
By cleaning the filter regularly (ideally once a month or as recommended by the manufacturer), you can prevent potential problems and extend the life of your washing machine. It’s a straightforward maintenance task that can save you from costly repairs and keep your washing machine running smoothly for years to come.
If, after cleaning the filter, your washing machine still experiences rinsing problems, there may be other underlying issues that require professional attention. In such cases, it’s best to contact a qualified technician to diagnose and fix the problem properly.
Remember, regular maintenance is key to keeping your appliances in top condition, and the filter in your washing machine is a small but essential component that deserves your attention. So, next time your washing machine acts up, try this simple trick and get your laundry routine back on track!
